How to Erase All Content and Settings on iPhone
Mar 30, 2022 • Filed to: Erase Phone Data • Proven solutions
Erasing all the data and the content is a phenomenon that is not appealing at the first place but the user needs to make sure that this idea and the related methodology is followed when the user needs to make sure that the phone is being sold, given out or donated. The most important point that is to be considered in this regard is the fact that the data that is deleted using the built in tools is 100% recoverable and if it contains sensitive info then the user will be doomed. This tutorial is all about the permanent deletion of the entire iPhone data.
- Part 1. What does "Erase All Content and Settings" do on iPhone?
- Part 2. Common way to erase all content and settings on iPhone
- Part 3. 1 click to permanently erase all content and settings on iPhone
Part 1. What does "Erase All Content and Settings" do on iPhone?
The most simple answer to this question is that the phone becomes brand new and the it has the same effect as that of the factory reset but the research in this regard has shown that the data that has been deleted through the factory reset technique is also recoverable using the advanced tools and technologies and for the same reason it is to be noted that the user should make sure that the method that is the best in this regard is applied to make sure that the best results are obtained. If the method that would be mentioned in the latter half of the tutorial is applied then the success chance is not only above 100 but the data that will be erased using this phenomenon will also make sure that it remains safe and secure all the time. This phenomenon will also make sure that the data integrity is protected all the times.
Part 2. Common way to erase all content and settings on iPhone
The user needs to make sure that the following process is followed in this regard to make sure that the user gets the best and the state of the art result for clearing data from the iPhone entirely:
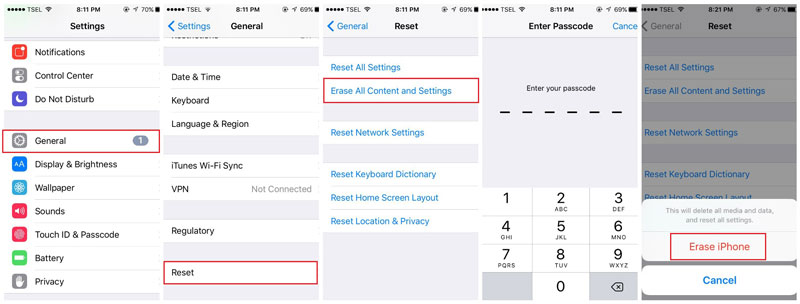
1.The iPhone settings are to be accessed to make sure that the process triggers and the right path is adopted to make sure that the user gets the best result:
2. The user then needs to make sure that the “Erase all content and Settings” option is selected to make sure that the device is wiped out completely. It is to be noted that reset all the settings will make sure that only the settings are wiped and the data remains safe and secure. It is for the same reason that the second option in this regard is to be selected to make sure that the user gets the best results and needful is also done with ease and satisfaction:
Part 3. 1 click to permanently erase all content and settings on iPhone
Dr.Fone - Data Eraser (iOS) is the best and the state of the art program which makes sure that the iPhone resetting is easy to perform and the best and the state of the art process is adopted to make sure that the data is deleted forever. The user needs to make sure that the process that would be mentioned in this part of the tutorial is to be followed to make sure that the user gets the best and the state of the art results all the time.

Dr.Fone - Data Eraser (iOS)
Easily Delete All Data from Your Device
- Simple, click-through, process.
- Your data is permanently deleted.
- Nobody can ever recover and view your private data.
- Works greatly for iPhone, iPad and iPod touch, including the latest models.
Following are some key features of the program which makes it one of the best of all times and also ensures that the user gets the best result in relation to device wiping:
1. Make sure that the program is downloaded and installed. Launch it and choose "Data Eraser" from the main menu.

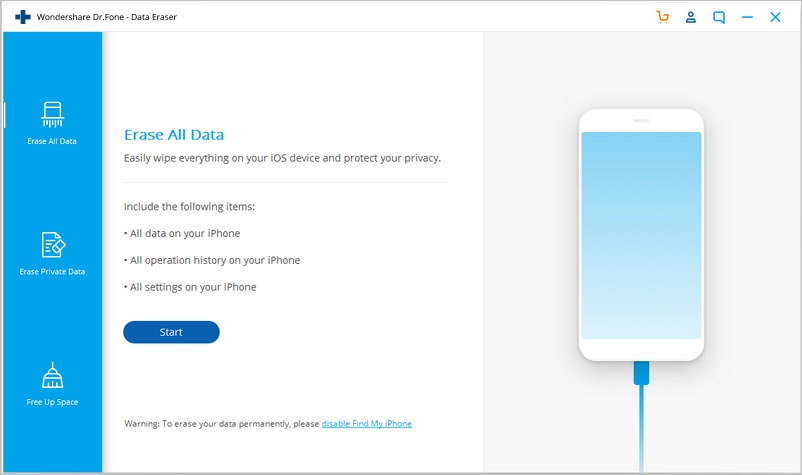
2. Then connect your iPhone to the computer and click "Erase All Data" from the program's option. Click "Erase" to begin the work.
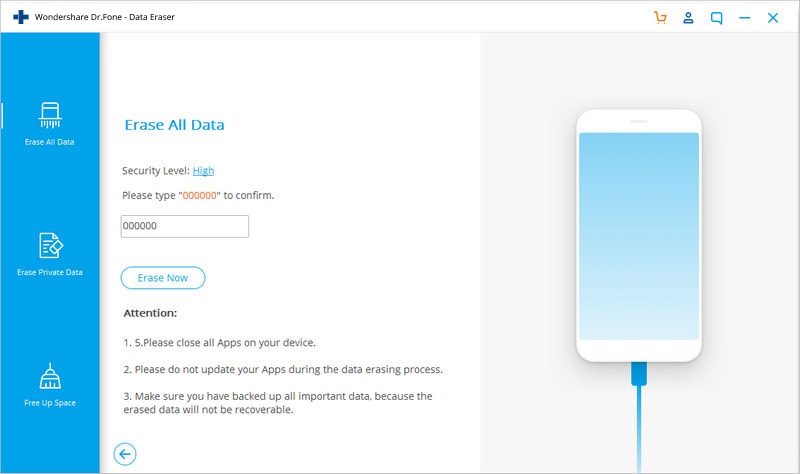
3. Then you need to make sure that the word "delete" is typed to proceed further in this regard. Then click "Erase now" to continue.
4. The device needs to be connected to make sure that the process is followed in the best manner.
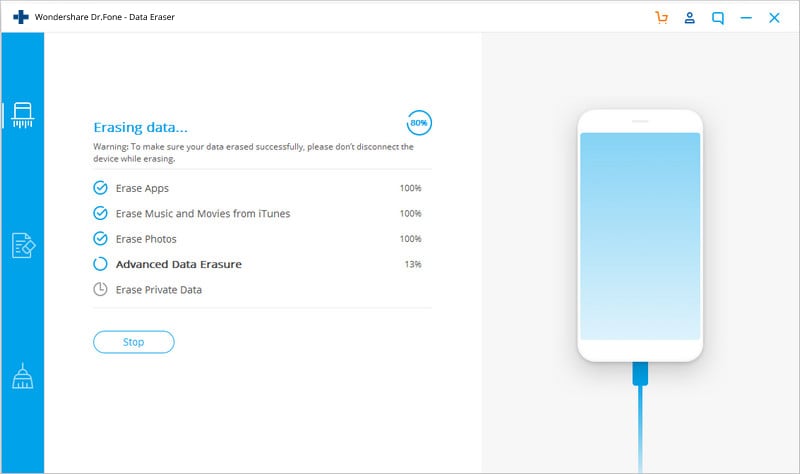
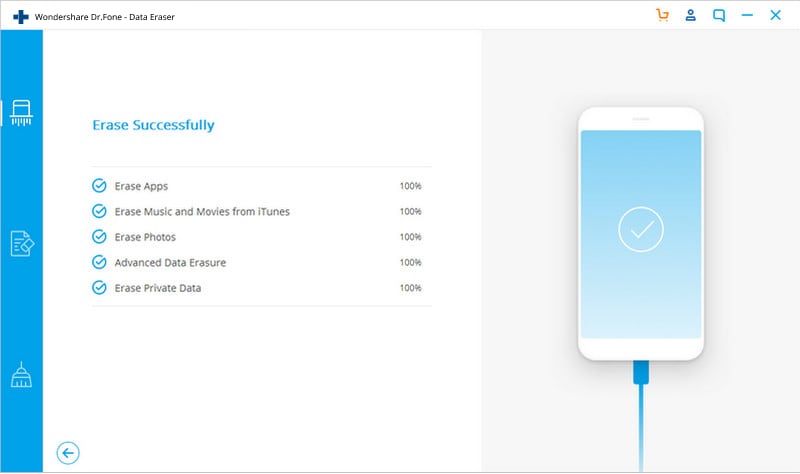
5. Once the data has been deleted, you will get the prompt and the process also ends here.
You Might Also Like
Erase Phone
- 1. Wipe iPhone
- 1.1 Permanently Wipe iPhone
- 1.2 Wipe iPhone Before Selling
- 1.3 Format iPhone
- 1.4 Wipe iPad Before Selling
- 1.5 Remote Wipe iPhone
- 2. Delete iPhone
- 2.1 Delete iPhone Call History
- 2.2 Delete iPhone Calendar
- 2.3 Delete iPhone History
- 2.4 Delete iPad Emails
- 2.5 Permanently Delete iPhone Messages
- 2.6 Permanently Delete iPad History
- 2.7 Delete iPhone Voicemail
- 2.8 Delete iPhone Contacts
- 2.9 Delete iPhone Photos
- 2.10 Delete iMessages
- 2.11 Delete Music from iPhone
- 2.12 Delete iPhone Apps
- 2.13 Delete iPhone Bookmarks
- 2.14 Delete iPhone Other Data
- 2.15 Delete iPhone Documents & Data
- 2.16 Delete Movies from iPad
- 3. Erase iPhone
- 3.1 Erase All Content and Settings
- 3.2 Erase iPad Before Selling
- 3.3 Best iPhone Data Erase Software
- 4. Clear iPhone
- 4.3 Clear iPod touch
- 4.4 Clear Cookies on iPhone
- 4.5 Clear iPhone Cache
- 4.6 Top iPhone Cleaners
- 4.7 Free Up iPhone Storage
- 4.8 Delete Email Accounts on iPhone
- 4.9 Speed Up iPhone
- 5. Clear/Wipe Android


Alice MJ
staff Editor
0 Comment(s)