How to Transfer Files Between iOS Devices and Computer?
Thank you for your interest in Wondershare Filmora - the easy-to-use and trendy video editing software that lets you empower your story and be amazed at results, regardless of your skill level. Filmora gives you a helping hand to get started with any new movie project by importing and editing your video, adding special effects and transitions, and sharing your final production on social media, mobile devices, or DVDs.
Part 1. What is Filmora
Thank you for your interest in Wondershare Filmora - the easy-to-use and trendy video editing software that lets you empower your story and be amazed at results, regardless of your skill level. Filmora gives you a helping hand to get started with any new movie project by importing and editing your video, adding special effects and transitions, and sharing your final production on social media, mobile devices, or DVDs.
Manage Your Phone Wherever You Go
Part 2. Video
· Add corrupted video
· Repair video
· Save video
How to grab solution

Lorem Ipsum is simply dummy text of the printing and typesetting industry.
Part 3. How to start your tab recording
To record voice-over with your microphone, set up access to your "Microphone" and choose your audio device. Filmora gives you a helping hand to get started with any new movie project by importing and editing your video, adding special effects and transitions.
To record voice-over with your microphone, set up access to your "Microphone" and choose your audio device. Filmora gives you a helping hand to get started with any new movie project by importing and editing your video, adding special effects and transitions.
Applicable for:
Filmora 12, Filmora 11, Filmora X, Filmora 9 release. See detailed System Requirements here.
| Input and Output | Type | Container formats or Device/SNS profiles |
| Supported Input Formats | Video Formats | See detailed Tech Specifications of Filmora for Windows |
| Audio Formats | ||
| Photo Formats | ||
| Supported Output Formats | Format | |
| Devices | ||
| Social Network | ||
| DVD |
File
| Action | Windows Shortcut |
| New Project | Ctrl+N |
| Open Project | Ctrl+O |
| Save Project | Ctrl+S |
| Save Project As | Ctrl+Shift+S |
| Archive Project | Ctrl+Shift+A |
File
| Action | Windows Shortcut | Windows Shortcut |
| New Project | Ctrl+N | Windows Shortcut |
| Open Project | Ctrl+O | Windows Shortcut |
| Save Project | Ctrl+S | Windows Shortcut |
| Save Project As | Ctrl+Shift+S | Windows Shortcut |
| Archive Project | Ctrl+Shift+A | Windows Shortcut |
File
| Action | Windows Shortcut | Windows Shortcut | Windows Shortcut |
| New Project | Ctrl+N | Windows Shortcut | Windows Shortcut |
| Open Project | Ctrl+O | Windows Shortcut | Windows Shortcut |
| Save Project | Ctrl+S | Windows Shortcut | Windows Shortcut |
| Save Project As | Ctrl+Shift+S | Windows Shortcut | Windows Shortcut |
| Archive Project | Ctrl+Shift+A | Windows Shortcut | Windows Shortcut |
Educational
For Student
- Read Student Pan Policy and log into Student Beans Account.
For Educator
- Please fill out the online form and contact our sales team to purchase a business plan for more than 20 users.
- Click to see more information about EDUCATIONAL PLAN.
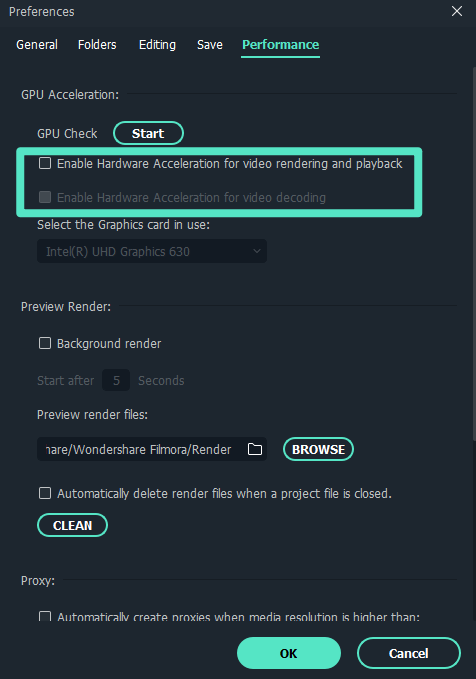
How to enable GPU Acceleration in Filmora for Win?
- ❶ Click File > Preference
- ❷ Choose Performance Tab
- ❸ Under GPU section, check the boxes in front of "Enable Hardware Acceleration for video rendering and playback".
- ❹ If you would also like to enable hardware acceleration for video decoding, you can also check the box in front of it.

1 Create Projects > 2 Cloud Project > 3 Creator Hub >4 Creator Hub >5 Creator Hub
✍도움이 필요하신가요?
질문에 대한 답변은 아래 FAQ 또는 추가 정보에서 찾을 수 있습니다:


